#GitHub pricing
Explore tagged Tumblr posts
Visit Tumblr Blog
Explore Tumblr blogs with no restrictions, modern design and the best experience.
Last Seen Tumblr Blogs


Fun Fact
70% of Tumblr users say the Dashboard is their favorite place to spend time online.
Text
5 Top Trested Web Site Old GitHub Accounts In 2025
Buy GitHub Accounts.If you are a developer, you must have a GitHub account. Buy GitHub accounts. Because GitHub is the world’s biggest code repository. Most developers use GitHub to exchange code and collaborate with others. The old GitHub account works well. You may buy new and existing GitHub accounts from us at extremely affordable prices with complete confidence. Thank you!
#Buy GitHub Accounts#Buy github accounts online#GitHub Free#GitHub Free for organizations#GitHub pricing#GitHub private repository free#GitHub Pro#GitHub Pro pricing#Is a GitHub account free?
2 notes
·
View notes
Text

#Buy GitHub Accounts#Buy github accounts online#GitHub Free#GitHub Free for organizations#GitHub pricing#GitHub private repository free#GitHub Pro#GitHub Pro pricing#Is a GitHub account free?
1 note
·
View note
Text
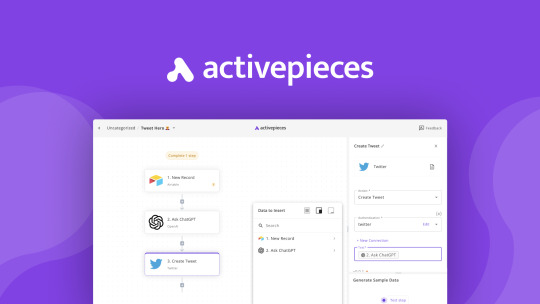
Activepieces:10 Best Reasons to Choose This No-Code Wonder
Activepieces: The no-code Zapier alternative. It helps you do tasks, and make content without any code. It improves your work better. Try it right now! Are you sick of running your business like rocket science? You probably feel bad when you need someone who knows computer code to fix your computers. Hiring someone who has complete knowledge of computer coding for your website or business, is a…
View On WordPress
#activepieces#activepieces 10 best reasons choose this no code wonder#activepieces best appsumo lifetime deal#activepieces create automations 100 apps#activepieces docker#activepieces funding#activepieces github#activepieces open source no code#activepieces price#activepieces pricing plans#activepieces review#building workflow activepieces#connecting with multiple apps activepieces#integration Chatgpt activepieces#why should I choose activepieces?
0 notes
Text
Supercharge Your Coding with GitHub Copilot: The Future of Intelligent Autocompletion
As a beginner software developer, you may find the process of writing long and monotonous code both boring and time-consuming. You might wonder if there are any AI tools available that can alleviate these coding challenges and make your work easier. Well,

View On WordPress
#AI#AI tool#artificial intelligence#Coding#coding problems#Developers#Framework#GitHub#GitHub account#GitHub Copilot#GitHub Copilot Pricing#IDEs#OpenAI#OpenAI Codex#Programming#Programming Languages#PyCharm#Software Developers#Technology#VS Code
0 notes
Text
A Brief Guide on Uploading ChoiceScript Demos to Itch.io
Since Dashingdon is shutting down, and there will be a lot of folks wanting to host their ChoiceScript demos elsewhere, I thought it'd be a good idea to provide a brief guide on how to do so for itch.io.
This is for Windows in the folder actions, but it shouldn't be too difficult for folks to translate for Mac. This also assumes you haven't changed any of the files within your game folder other than those found under 'scenes'.
Within your game folder, locate the 'web' subfolder, right click it and select 'Send to' then 'Compressed (zipped) folder. Name your newly compressed file something sensible, and I recommend moving it to a new folder outside of your game files, just to keep everything neat and tidy.

2. Assuming you already have an itch.io account, navigate to your dashboard, and click the 'Create New Project' button.

3. Name your project as you like, and under 'Kind of project', select the 'HTML' option.

4. Set the 'Pricing' to 'No Payments', you cannot use ChoiceScript for profit unless it is with the Choice of Games or Hosted Games publishing labels. No one wants to get in trouble unnecessarily here.
5. In the Uploads section, upload your newly zipped file we made in step one. After it's finished uploading, you'll be given one drop down and two tick boxes. You need to tick the 'This file will be played in the browser' option.

6. I've found so far that 'Viewport dimensions' work quite well for desktop at 1080 x 640. Either use these numbers or experiment and find what works best for you.
7. You must tick the 'Enable scrollbars' option for your game to display properly, otherwise options, text and buttons can be clipped off the bottom of the viewport.

8. Continue filling out the rest of the form, or skip it for now and scroll all the way to the bottom to the 'Visibility & access' section. Here make sure you have 'Draft' selected. This prevents others from finding your game until you're ready, and I always recommend play testing things before you make your work public.
9. Finally, hit the 'Save' button, then go and have a look at your creation by hitting the 'View page' link. And there you go! When you're ready for public release, just change the option in section 8 to 'Public'.
---
A few things to bear in mind about hosting on itch.io:
There isn't currently any way for your readers to save their game. I'm sure someone could write in a plugin similar to Dashingdon's at some point, but as for right now, this isn't available. See addition/edit below.
Make sure you properly tag your game with the 'choicescript' and 'interactive-fiction' tags. There are an awful lot of games on itch.io and it's easy to get lost in the crowd. Make sure folks can find you by having the right tags.
I hope this brief guide was useful to folks.
Best of luck to you with your writing!
---
Addition/Edit:
Thanks to @hpowellsmith for bringing this to my attention. You can add save functionality to your game by using this addon:
The ChoiceScript Save Plugin
Just tried it out on my own game and it works perfectly.
Rather than run through the addon author's own tutorial here, I'll just forward you to the Readme on their Github page.
One small note I would add is when it asks you to make the two small additions to your index file, make sure you right click the file and open it with your coding program, don't double-click it as this will just open it in an internet browser, and it won't give you the access to what you need to change.
715 notes
·
View notes
Text
At time of writing, Kerbal Space Program 1 is on sale for $10 on Steam.
If you have wanted to buy KSP and have never gotten around to it, now would be a good time.
Despite the failure and cancellation of KSP2, KSP1 is still a really great game. I bought it for 18 dollars in 2012, and it remains one of my favorite games of all time and perhaps the most cost effective game purchase I've ever made.
KSP1's development is completely finished, but the modding scene is still going strong.
The DLCs are also available for half price. Here's my thoughts on them:
Making History: adds historical-themed rocket parts in new size categories, and a mission editor that allows you to design mission plans and share them for other players to fly. I do not recommend this one, because the rocket parts have been done better by free mods, and because no one ever ended up using the mission editor since those missions are walled off in their own scenarios and can't be integrated into a normal game.
Breaking Ground: adds sparse rocks and other ground scatters to the surface of planets to be explored by rovers. Much more interestingly, adds robotic parts which can totally change the kinds of vehicles and crafts you can build. I do recommend this, because the addition of robotic parts adds so much to the game.
But the real goodies are in unofficial mods. Here's my absolute must-haves:
Restock: The rocket parts in the stock game are a mix of different styles by different amateur artists who have worked on the game over the years, lacking an overall cohesive style. Restock reskins (but otherwise does not modify) all of the stock parts using new models and textures that bring a cohesive visual identity to KSP that it has sorely missed. The models are higher fidelity in most cases, but they have been made efficiently so that the game will actually run and load faster and smoother with Restock than without it. (Github)
Restock Plus adds a few other parts in the same style to round out some missing parts, and if you do not have Making History, it will add its own versions of those parts for free (and with better game balance, in my opinion). (Github)
Scatterer: Replaces the archaic stock atmosphere rendering from 2011 with an accurate simulation of rayleigh scattering, vastly improving the look of planets both in space and on the surface. (Github)
KSP Community Fixes: Bug fixes and quality of life tweaks, especially useful in light of KSP's development being discontinued. (Github)
Some tips (below the cut)
KSP allows you to build rockets almost lego style out of modular parts. The game does include a few tutorials which I do recommend you try (imperfect though they are), but here's a few other helpful tips:
there are two ways to attach parts: node attach (connecting parts via those green and black spheres that appear when you're holding a part) and surface attach (connecting parts where your mouse is). If a part can be surface attached, it will always prioritize that over node attach. So if you're trying to put together a rocket tank and the tank keeps trying to attach to the other tank wrong, you have to change your camera angle so that the nodes can come together without your mouse going over the part. The alternative is to hold the ALT key, which will force the part to attach only to a node.
The C key and the X key control angle snap and symmetry mode. There's also buttons for these on the lower left of the u.i. Symmetry is a must for building rockets.
There's three main types of engines: Liquid Fuel rocket engines, which require separate fuel tank parts burning Liquid Fuel and Oxidizer, Solid Rocket Boosters, which contain their own fuel and can not use fuel tanks or be throttled, and Jet Engines, which burn liquid fuel and atmospheric oxygen from air intakes, at a high efficiency.
There's also the ion engine, which uses electricity for power and xenon gas as a propellant for extremely high efficiency and extremely low thrust, the nuclear thermal rocket, which uses an onboard nuclear reactor to heat up liquid fuel propellant for high efficiency and low thrust, and monopropellant RCS, which are steering thrusters that use monopropellant tanks shared between all stages. There's also a single 'normal' engine that burns monopropellant, the Puff.
At a first approximation the game uses real orbital mechanics. To get to space, you just have to go straight up above 70 kilometers. To stay in space, you must enter orbit, which means your sideways velocity has to be somewhere around 2500 meters per second so as you fall you curve around the planet. The M key brings up the map mode, showing you your trajectory. It'll also show you if your orbit intersects the planet, and you can mouse over Ap (your apoapsis, the farthest distance in your orbit) or Pe (your periapsis, the closest approach in your orbit) to see if they are above 70 kilometers.
At first approximation the game uses real rocket science. The more fuel you add, the more fuel you're wasting to carry that fuel. Staging (detaching tanks and engines when they're no longer needed) using decouplers is a must. Parachutes are also a must if you want to preserve the lives of your Kerbals, but remember. This game is realistic. Parachutes will not work on airless bodies like the Mun, and they may not be enough on their own on martian planets like Duna which have only thin atmospheres.
Career mode is kinda... not very well made? I would start with Science Mode. The tech tree will kind of ease you into building with limited parts. But you can always jump right into sandbox mode.
Rocket parts come in a few diameters sizes: 0.625m, 1.25m, 1.875m, 2.5m, 3.75m, and 5m. In addition, there are 1.25m (mk1), diamond-shaped 1.25x2.5 (mk2), and roughly 3.75m (mk3) spaceplane parts. The aerodynamics and structure works out best when same diameter parts are connected together. There are adapter parts to facilitate this, as well as fairings (procedurally shaped aerodynamic casings) and engine plates if you need to get around this.
Turn on Advanced Tweakables in the settings. This will allow you to right click on parts and select "rigid attachment", and to use "autostrut", both of which are necessary for making rockets behave. (you could try and use strut parts, but that can bloat your part count and often times it isnt clear how to even attach a strut in the direction you need) This is one of my least favorite parts of KSP, as this is pretty tedious for a large rocket, but it's necessary to keep it from flopping around. For some reason KSP's developers thought that floppy rockets (even when they should be perfectly rigid), would be more fun. The idea comes from the early days of the game, when the conventional wisdom was "if it moves and it shouldn't, add struts; if it doesn't move and it should, add more boosters." The game has gotten a lot more complicated now, and that design philosophy should have been left in 2012. There's also a mod, Kerbal Joint Reinforcement, that will provide this functionality without needing autostrut and rigid attachment per part.
On efficient launches, you're going to end up looking like you're burning up. This is a limitation of the 1/10th scale planets in KSP, and how that plays with the 7/8ths scale atmospheres. During a real launch as well as an efficient KSP launch, you'll end up travelling at 1500-2000 m/s in the upper atmosphere, but in the real world that's only a fraction of orbital velocity. In KSP, that is near orbital velocity, and so the game is balanced to assume you're in reentry conditions. If you have fairings to protect sensitive parts of your ship, you should be fine.
KSP's small scale makes Apollo's Lunar Orbit Rendezvous approach inefficient for the Mun and Minmus. It's actually cheaper to just directly land on the surface. This can be fixed by installing a rescale mod such as Sigma Dimensions, and setting it to 2.5 rescale and resize, and 1.6 rotation period scale. This makes delta-v 1.6 times larger than stock KSP, resulting in more realistic proportioned rockets. The game honestly isn't any harder in this state, it just needs somewhat bigger rockets. All that aside, the "Apollo style" orbital rendezvous approach works great for all other planets, since interplanetary transfer requires more fuel as do most planetary landings. This approach has two spacecrafts launch either together or separately that travel to the destination planet docked together. The lander then separates, lands, and eventually launches again, but only back into orbit, where the orbiter picks up the crew and they launch back home.
The KSP solar system is not a 1:1 copy of our system. Moho is a lot like Mercury, Eve is like Venus but purple and much more massive, Kerbin is like Earth, Mun is like the Moon but about three times closer, Minmus is a small moon orbiting far from Kerbin, Duna is like Mars, but instead of small asteroid moons, it has an almost planet sized moon which is almost a binary companion. Jool is a gas giant that orbits where Jupiter should, but it's undersized, and orbited by three huge planet sized moons, including the ocean world Laythe, the ice planet Vall, and the airless Kerbin-mass rocky planet Tylo. In addition, two small minor moons. There's also a big Ceres analogue called Dres and Eeloo, a cracked, icy world in a 2:3 resonance with Jool, just how Pluto is in a 2:3 resonance with Neptune. There are mods that add more planets to the stock system, as well as mods that replace the stock system entirely. There's even Real Solar System (which is designed to be played with Realism Overhaul, a modpack that's almost a different game entirely)
29 notes
·
View notes
Text
So, Helldivers 1 had the converted Russian price on steam double that of other central-asian countries, higher than the US's even - higher, in fact, than any other country, despite the Ruble being a weaker currency. Helldivers 2 is simply not sold to Russian steam accounts, and cannot be purchased in Rubles at all, and along with it, Helldivers 1 is now also not available to Russians. With the apparent satire of US nationalism the devs were going for, it's honestly amazing how they managed to be at the absolute forefront of it in gaming, only behind those github maintainers who committed malicious code that would brick machines with Russian IPs. I'm starting to think all the chuds who say the game's military ads are unironically cool are actually the only ones who truly understood the devs, lmao.
188 notes
·
View notes
Text
If you're farming mirror defense, getting the two weapons, 2 Citrines, and 21 arcanes each:
You would need an average of 20 hours and 49 minutes to get everything (Simulated 10000 times. Assume 1 full rotation takes 24 mintues. Also taking into consideration that you can use shards to buy missing stuff from Otak)
If you buy all things from the in-game market and warframe.market, it would instead cost roughly 1878 plat (arcane prices calculated with the average price of the past 90 days on warframe.market)
that means this farm would yield an average of 1.5 plat per minute. you really should just be farming prime parts instead
detail below
The execution result:

The code:
19 notes
·
View notes
Text

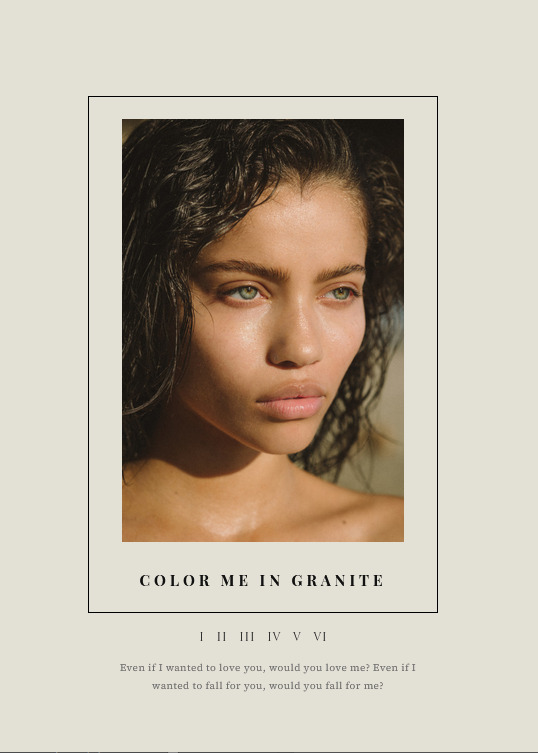

VISVIVA PRESENTS: GRANITE a simplistic, elegant free theme
hello everybody! I'm so excited to finally get this out to the tags after working on it for so long! This is my first theme and I'm a self taught coder, so I'm very proud and thrilled to share it with you all! I know how much we all love elegance in the writing community and wanted to bring in a theme that you can customize to your own elegant preferences without ANY coding knowledge. I would like to thank @seyche for their base code and @glenthemes for their music player! and for being all around amazing coders of whom I both am inspired by and admire! All of that being said, I present to you my very first theme of many:
COLOR ME IN GRANITE
PREVIEW | DOWNLOAD: GITHUB / PASTEBIN / CODEPEN
FEATURES
no coding knowledge needed! fully customize from the comfort of the theme options
high resolution, automatically resizing sidebar image. I have made it so that any image you upload for the sidebar will automatically be made high resolution and resize to fit the sidebar. this will, of course, work best on already high res images :)
FULLY CUSTOMIZABLE PINNED POST TITLE. Change your pinned post title, font AND give it a very dapper highlight
a choice of 16 FONTS for you to change the look of your blog's written content, including your sidebar title!
optional indented paragraphs! ( follow this easy tutorial )
posts with inner scroll! all text posts will automatically gain a scrollbar if they get extremely long. no more clogging up your front page with a single thread!
title'd tag pages. any time you click on a tag, a simple but aesthetic title will appear above the posts section.
music player by glenthemes - just type in your artist, song name, and mp3 link and you're all set! for help on how to get an mp3 link of your favorite song, click here to see the lovely HT's super easy tutorial!
responsive design that changes dimensions as your screen gets smaller
npf images + unblue polls by glenthemes + more!
if you download this theme, please give this post a like or reblog!
because tumblr is giving me the run around with js permissions, I have created a temporary preview of this theme on a standalone blog. please do not send asks to that blog, or I likely won't see them! if you run into any problems at all, please do not hesitate to message me!
PRICE & DONATIONS
This theme is a FREE theme! I love to code mostly just for the art and therapeutic nature of it, so for now all of my themes will be free. However, if you would like to support me and my work, please consider leaving a tip or buying me a coffee via cashapp ( $visviva ) :)
#rpc#rph#rpt#tumblr rp#rp theme#free rp theme#free theme#roleplay resources#indie theme#indie rp#visvivathms#dearindies#supportcontentcreators
166 notes
·
View notes
Text


Packet is back, sort of.
With media being a disaster I keep going back to the local level, local control, no profit BBS. Growing up in the heyday of the Packet BBS on Ham Radio (pBBS) systems were federated pathways to discourse. While the price of entry was technical acumen, some radio equipment, and a licensed to operate it these days we have something else. Now, we have meshtastic net which operates in an area, not requiring a license and while you still need some technical acumen, you can do it through your cell phone.
Will this late 20th century mode be palatable to the 21st century sensibility who is to say? Mesh networks can give us back some degree of communication, communications freedom in the digital age and for 30+ years of playing radio it was another way of giving back to set one of these babies up. 
Today it’s operating on an ancient laptop with Damn Small Linux as an operating system. Eventually, it will be migrated to a micro computer like a pie zero that can just sit and chirp away in the digital wilderness, waiting for people to play with it and leave each other notes, emails and bulletins. Eventually, if our network grows and somebody on the other side of town is running a meshtastic BBS, they can even pass email between each other! 
The git hub wasn’t too hard to follow though we use python3 now and as it’s python based you don’t have to get into Linux to play around. I find the Android meshtastic app works far far better than the iOS version though.
7 notes
·
View notes
Text
Best WebSite In 2025 Old GitHub Accounts Purchase Now Quickly
Buy GitHub Accounts.If you are a developer, you must have a GitHub account. Buy GitHub accounts. Because GitHub is the world’s biggest code repository. Most developers use GitHub to exchange code and collaborate with others. The old GitHub account works well. You may buy new and existing GitHub accounts from us at extremely affordable prices with complete confidence. Thank you!
#Buy GitHub Accounts#Buy github accounts online#GitHub Free#GitHub Free for organizations#GitHub pricing#GitHub private repository free#GitHub Pro#GitHub Pro pricing#Is a GitHub account free?
0 notes
Text
Buy GitHub Accounts
Buy GitHub Accounts.If you are a developer, you must have a GitHub account. Buy GitHub accounts. Because GitHub is the world’s biggest code repository. Most developers use GitHub to exchange code and collaborate with others. The old GitHub account works well. You may buy new and existing GitHub accounts from us at extremely affordable prices with complete confidence. Thank you!
#Buy GitHub Accounts#Buy github accounts online#GitHub Free#GitHub Free for organizations#GitHub pricing#GitHub private repository free#GitHub Pro#GitHub Pro pricing#Is a GitHub account free?
0 notes
Text
Stepping Backwards a Bit (or 24)
I was looking for a simpler project. My recent 68030 work has been challenging and really pushing the limits of what I can do. I wanted something I could work on, but perhaps where someone else has already worked out the hardest parts.
I find laying out PCBs to be rather relaxing. It's one of those repetitive, almost meditative tasks, like needlepoint or whittling. The kind of hobby where I can turn on some music or a comfortable old TV show, zone out for a few hours, and wake up to this new thing that I created.
Debugging however is very mentally taxing, and the design work required to have a functional schematic to create a PCB for is an active whole-mind prices. So what I really needed was an existing project I could design a board for.
Enter [Grant Searle]. If you're not familiar with [Grant Searle], he has excellent designs for breadboard computers with a very minimal parts count. I studied his minimal Z80 design when I was first starting to build my own computers and learned a lot from it. I highly recommend his work for anyone who is interested in learning how to build their own computer but doesn't know where to start.
I was recently given a Rockwell 6502 CPU pulled from a dead LED marquee. I've never actually worked with 6502, so this seemed like a good time to try building Grant's 8-chip (or 7-chip) 6502 computer.
A few hours later, I had a PCB design completed, gerbers generated, and an order placed. Less than $5 for 5 boards, including shipping. A couple weeks later they arrived in the mail.


I did end up making a few modifications to [Grant]'s design. Instead of a clock circuit made from a discrete crystal and a couple inverter gates, I used a TTL oscillator because I've always found them to be more reliable. I also added support for an FTDI USB Serial adapter chip so that the board can be used with a modern computer as a terminal. And finally, since a PCB is much harder to add new components to relative to a solderless breadboard, I added an expansion header. All of it wrapped up in a compact PCB with lots of helpful silkscreen marking.

I realized after I had ordered the PCBs that the 16kB ROM chips [Grant] used are no longer manufactured or readily available. I have plenty of 8kB EEPROM chips on hand however. Thankfully the OSI BASIC interpreter [Grant] ported to this design fits within 8kB, so I was able to make a few adjustments and re-assemble it to work with the ROM chips I have on hand.
After a small glitch with my EEPROM programmer, it works!

It's quite a change going from my 33MHz+ 68030 to this tiny 6502 running at just under 2MHz. The BASIC text-based Mandelbrot renderer that completes in seconds on my 68030 takes four and a half minutes on the 6502. Not bad at all, considering my bus-impaired 68000 build takes 9 minutes to do the same.
This was a fun little project. It was a nice little break from some of the more difficult projects I've been working on. I have shared the project on GitHub for anyone who might want to take a look.
I hope to have this project with me this weekend, June 14-16, 2024 at Vintage Computer Festival Southwest. I'll be at table 207 in the Tandy Assemble hall, just across the street from the main exhibit hall.
30 notes
·
View notes
Note
What do you use to make blinkies? :0 they are so so cool and I would love to make some myself!!!! I hope you have a fantastic day!!!
I used a program called "Aseprite" for the blinkies! It's overall a great program for making pixel arts. I have the paid Steam-version myself (& its price isn't too bad imo, iirc it was like around 15-20 euros), and it's also available on itch.io. And I'm not 100% sure whether there is a legit way of obtaining it for free. But it does require some research and more investigation, I'm just too lazy to go into the search engine now, lol. (Adding to this: apparently it is possible to get Aseprite for free by compiling it from scratch off GitHub. There's probably instructions for it somewhere online, but yet again, too lazy to find more info on it and I haven't actually tried that method myself. Compiling programs is a bit tedious to do imo.)
However, there's some neat free alternatives to it too, like LibreSprite (which is basically just a fork/copy of Aseprite actually, but it's also free to use!), GraphicsGale, GIMP (when configured for pixel art), classic MS Paint, and much more! Here's a neat list that I found online, of some pixel art-tools/programs out there!
Then when it comes to making blinkies themselves: I use a canvas size 150x20 pixels. For animating them, I tend to use either 2-4 frames, depending on how smooth I want the animation to be. For simple blinkies though, I just use 2 frames in which I slightly alter the blinkie borders for each frame.
A bit of rambling here, but I hope that this was helpful in some way! <3
7 notes
·
View notes
Note
L, imagine needing to buy office, the versions I run are nearly or over 10 years old at this point -vista
Imagine buying Microsoft 365 (formerly Office) when you can easily subscribe to it and pay monthly (or yearly, but this gives you an evil bad discounted price). Couldn't be me! tmas github
#ask#ask box experience#win-vista-official#i guess? the windows-vista-official one is dead#windowsposting#windows11-official
4 notes
·
View notes
Text
Okay nerding out for a sec
youtube
I found this FREE addon for Blender called GBH Tool that lets you make hair cards from Blender's hair system as well as giving you around 40 different geometry nodes its insane
Technically it costs $15 on their Gumroad, but you can get it for free on their GitHub. 100% worth the price, though I wish there was more customization regarding the creation of the hair cards.
There is another addon that can do this called Hair Tool but it costs almost 3X as much and its more aimed at professionals
6 notes
·
View notes